Images, PDFs, and MTGProxyPrinter
Fast start with an easy PDF source, then dial in high-DPI prints with MTGProxyPrinter and optional upscaling.
Quick Start: Get a PDF from MTGPrint
Visit mtgprint.net to quickly build a sheet and export a PDF. When exporting, enable Crop Marks.
You can also use that same list to continue with advanced workflows.
Add cards into MTGProxyPrinter
Import a Deck List:
- Open
File→Import Deck List. - Paste your deck list and click
Next. - Choose the
MTG Arenaradio button → clickNext(wait for processing). - Click
Finish.
Install and Configure MTGProxyPrinter
Download from MTGProxyPrinter download page.
Application→Settings→Default Document Settingsto set paper size/margins globally.- Or per file:
Edit→Document Settings. - Inside
Document Settingsyou can also set aBleed— handy if your cuts aren’t 100% precise or when printing double‑sided cards to avoid white edges. - Enable
Print Cut Markers.
Printing
- Print directly from MTGProxyPrinter (recommended) or export a PDF.
- When printing, always use the system print dialog.
Create a Two‑Sided PDF (Front/Back Alignment)
For manual duplex printing where you flip the paper yourself, build two PDFs (fronts then backs) with matching positions.
- Open
Application→Settingsand uncheckAutomatically add the other side of double‑faced cards. - Create your FRONT sheet: import or place the first‑side images in any order (e.g., 1 → 9 across the 3×3 grid) and export a PDF.
- Create your BACK sheet: add the second sides using this mapping per row to mirror the fronts:
- Row 1: (1 ↔ 3) and (2 ↔ 2) and (3 ↔ 1)
- Row 2: (4 ↔ 6) and (5 ↔ 5) and (6 ↔ 4)
- Row 3: (7 ↔ 9) and (8 ↔ 8) and (9 ↔ 7)
- Print the FRONT PDF, flip the stack consistently, then print the BACK PDF. Use identical margins, bleed, and scale on both prints.
Advanced: Upscale Your Cards for Better DPI
- In MTGProxyPrinter:
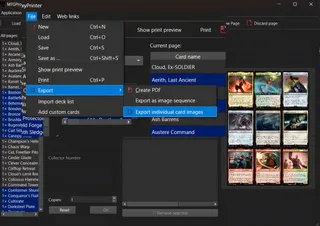
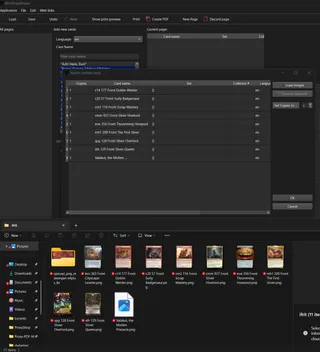
File→Export→Export individual card imagesto an empty folder. - Open Upscayl, switch to
Batch Mode, select that folder, choose your model, and Upscayl. - Back in MTGProxyPrinter:
File→New, then drag the upscaled images into the document.


More Tools: Build PDFs and Trim Bleed
- print-proxy-prep— desktop utility to crop away bleed from card images (including Proxyshop renders) and assemble printable PDFs. Great for quick, at‑home jobs. See repo for setup.
- ProxyPrint (web)— online builder to arrange images into sheets and export a PDF.
Both tools complement MTGProxyPrinter—use whichever fits your workflow.
Create Custom Cards
Design fully custom cards with one of these tools:
- Proxyshop— best if you have Adobe Photoshop; generates high-quality, print-ready renders.
- Card Conjurer (self-hosted)— runs locally with Docker or a simple launcher.
Card Conjurer: Installation
Prefer a video walkthrough? Watchthis guide.
Card Conjurer: Docker installation
- Install Docker:Get Docker
- Install
make(Windows users may need to install it separately). For macOS/Linux, see the repo instructions. - Download the Card Conjurer repo (Green
Codebutton →Download ZIP) or clone it with git. Extract the ZIP if downloaded. - Open a terminal in the project folder and run
make start. - Open
http://localhost:4242/in your browser.
Card Conjurer: Simple launcher (no Docker/WAMP)
- Works best on Windows. If you can follow the Docker method above, prefer that.
- Download the repo ZIP fromCard Conjurer GitHub, then extract it.
- macOS only: in the project folder, run
chmod a+x launcher-macosonce, then right‑click the file → Open With → Other → enable “All Applications” → choose “Terminal” and “Always Open With”. - Run
launcher.exeon Windows,launcher-macon macOS, orlauncher-linuxon Linux. - Your browser should open to your local Card Conjurer site. If assets look stale, press
Ctrl+F5to hard refresh.